Hosting My Own Sh*t
For a while now I’ve been looking at a tonne of other people hosting their own websites, building cool home labs, or just doing more interesting stuff. I’ve read of people carving out their own little place on the internet. Doing something that they truly own. Something that has to be found. Not served through some algorithm. I wanted a piece of the pie. I wanted to finally complete the LARP and actually put my money where my mouth has been for a while.
By the time you are reading this article, this blog is being hosted of my old laptop from high school. Sitting in my bedroom.
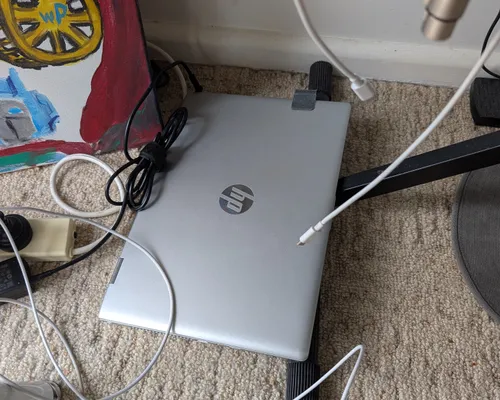
Here is my server!!!
Now the following is not meant to be a guide or anything. It’s more of a rough documentation of the steps that I’ve followed. Perhaps more for myself than anyone. It may be possible though, that you feel inspired by seeing this. If so, feel free to reach out to me about help.
One of the perks of having a personal server is the fact that I know get my own
email address! You can mail me at jayant@jayantgodse.com (HOW SICK IS THAT.
I’VE ALWAYS WANTED THIS)
Installing Ubuntu
Straightforward. I already had an Ubuntu server 24.04 LTS lying around. (I’m not sure why) Plugged into my PC, wiped windows and connected it to the internet. Easy peasy. Organisation
Connecting via Ssh
On the server I had to tinker with the sudo systemctl start ssh command. Until
it was working. Figured out its IP through hostname -I (the capital is
important) and then pinged it from my laptop. Once I knew it was alive, I could
just ssh into it.
Then I set up some SSH key access. On the server I went to the
/etc/ssh/ssh_config and allowed PubkeyAuthentication
Then on my laptop, I made ran ssh-keygen added it to a directory called
.ssh/home ended up with my 2 keys. Copied the public key over to the
.ssh/authorised_keys file on the server using vim and set up an alias on my
laptop sshome="TERM=xterm-256color ssh jayant@MY_IP_ADDR (Had to do the TERM
var change, because Ghostty seems to have its own Terminal setup)
Installing Docker on the Server
- installed Docker through apt
- Installed brew by following the instructions
- Installed
lazydocker- Ran into issues, had to add my user
jayantto the Docker user group. - Had to run
sudo usermod -aG docker $USERto do that.newgrp dockerto confirm the add. - Then ran
docker run hello-worldto check.
- Ran into issues, had to add my user
Making Sure It Doesn’t Sleep
Had to go to this file etc/systemd/sleep.conf and change all the sleep and
hibernate commands to ‘no’
A bit embarrassing but I didn’t realise that you actually have to uncomment
the lines in the .conf file.
Spinning up My Site on the Server
This was actually pretty simple really. I just had to write a quick Dockerfile
for my Astro app, then change the hosting adaptor to node (I can probably
change this back to static in the future.)
Setting up a Reverse Proxy
I then chose to set up an NGINX container. I manged to steal a configuration from off an article on the internet, then had to modify a couple of things in order to get it to work.
Fortunately NGINX is quite easy to configure. (And I’m not doing anything crazy with it.)
Making Things Public
After all this was to actually make things visible outside of my home network. This required a bit of digging, but I landed on using a DDNS service to make my stuff public.
DuckDNS
No idea how I stumbled on this, I think I was snooping my routers configuration website and it mentioned this as one of the configuration options for DDNS. So here we are. I gave it my credentials, and it gave me the following cronjob to run:
echo url="https://www.duckdns.org/update?domains=exampledomain&token=a7c4d0ad-114e-40ef-ba1d-d217904a50f2&ip=" \
| curl -k -o ~/duckdns/duck.log -K -*/5 * * * * ~/duckdns/duck.sh >/dev/null 2>&1This I believe means that the thing is updated at 5 minutes?
PorkBun
Derek Sivers recommended that I should buy my domain from PorkBun. So I did just that. I quite like how lighthearted their whole site it.
I then had to make an alias that mapped my domain to the provided DuckDNS domain. Which was quite straightforward.
Certbot
Now this one was a doozy and took a hot minute. The main complication was the fact that my NGINX instance was inside a container. This meant that anytime I update the certs, I would have to restart the Docker container it runs in.
I resorted to doing the certificate creation outside of the containers. I now
have a script that gets certs from Letsencrypt every day at 3am and then it
tells the NGINX container to restart if the certs are renewed.
Perhaps this stands to be improved, but that’s a problem for another day.
And I Think That’s It?
That’s genuinely all I had to do. I’m currently continuing tinkering with getting my server to also handle email. I can get it manage ‘incoming’ mail, but I can’t send anything to anyone until I jump through a lot of SMTP hoops. But hopefully once that’s done, my personal email will change to my very own!!!